


Download WebSiteSniffer (x32 version)
Download WebSiteSniffer (x64 version)
Description
WebSiteSniffer is a packet sniffer tool that captures all Web site files downloaded by your Web browser while browsing the Internet, and stores them on your hard drive under the base folder that you choose. WebSiteSniffer allows you to choose which type of Web site files will be captured: HTML Files, Text Files, XML Files, CSS Files, Video/Audio Files, Images, Scripts, and Flash (.swf) files. While capturing the Web site files, the main window of WebSiteSniffer displays general statistics about the downloaded files for every Web site / host name, including the total size of all files (compressed and uncompressed) and total number of files for every file type (HTML, Text, Images, and so on)System Requirements
- This utility works on any version of Windows, starting from Windows 2000 and up to Windows 7, including 64-bit systems.
- One of the following capture drivers is required to use WebSiteSniffer:
- WinPcap Capture Driver: WinPcap is an open source capture driver that allows you to capture network packets on any version of Windows. You can download and install the WinPcap driver from this Web page.
- Microsoft Network Monitor Driver version 2.x (Only for Windows 2000/XP/2003):
Microsoft provides a free capture driver under Windows 2000/XP/2003 that can be used by WebSiteSniffer,
but this driver is not installed by default, and you have to manually install it, by using one of the following options:
- Option 1: Install it from the CD-ROM of Windows 2000/XP according to the instructions in Microsoft Web site
- Option 2 (XP Only) : Download and install the Windows XP Service Pack 2 Support Tools. One of the tools in this package is netcap.exe. When you run this tool in the first time, the Network Monitor Driver will automatically be installed on your system.
- Microsoft Network Monitor Driver version 3.x:
Microsoft provides a new version of Microsoft Network Monitor driver (3.x) that is also supported under Windows 7/Vista/2008.
The new version of Microsoft Network Monitor (3.x) is available to download from Microsoft Web site.
- You can also try to use WebSiteSniffer without installing any driver, by using the 'Raw Sockets'
method. Unfortunately, Raw Sockets method has many problems:
- It doesn't work in all Windows systems, depending on Windows version, service pack, and the updates installed on your system.
- On Windows 7 with UAC turned on, 'Raw Sockets' method only works when you run WebSiteSniffer with 'Run As Administrator'.
Known Limitations
- WebSiteSniffer cannot capture files of a secured Web site (HTTPS)
- When downloading a large file with a fast Internet connection, WebSiteSniffer might lose some of the packets, and thus the captured file will be corrupted.
- If some of the Web site files are taken from the cache of your Web browser, WebSiteSniffer won't be able to capture them. To ensure that all Web site files are captured by WebSiteSniffer, clear the cache of your Web browser, or use the 'Start Private Browsing' option of Firefox.
Captured Files Directory Structure
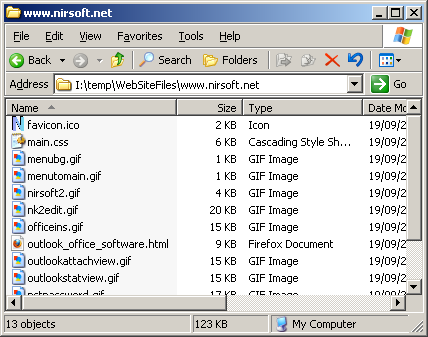
For every Web site or host name, WebSiteSniffer creates a separated subfolder under the main download folder that you choose. For example, if you browse into www.nirsoft.net Web site, all files downloaded from www.nirsoft.net are stored under www.nirsoft.net subfolder.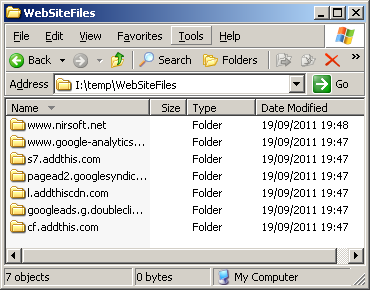
When opening the subfolder of specific host name/Web site, you'll find all files captured from this Web site:
Start Using WebSiteSniffer
Except of a capture driver needed for capturing network packets, WebSiteSniffer doesn't require any installation process or additional dll files. In order to start using it, simply run the executable file - WebSiteSniffer.exe After running WebSiteSniffer in the first time, the 'Capture Options' window appears on the screen, and you're requested to choose the base folder to download and extract all Web site files, the file types that you wish to capture (html, image, video, audio, scripts, and so on...), the capture method, and the desired network adapter. In the next time that you use WebSiteSniffer, it'll automatically start capturing the web site files according to the last selected settings.After clicking the 'Ok' button, WebSiteSniffer starts capturing the network packets on your network adapter. You can simply open your Web browser, browse into any Web site you like, and you'll see the files of the Web site you visit accumulated under the base folder that you chose. The main window of WebSiteSniffer also displays the statistics about captured files for every Web site. You can also select the desired Web site item and press F8 (Open Web Site Folder) to open the folder of the selected Web site in Windows Explorer, and easily view all files captured from this Web site.
Translating WebSiteSniffer to other languages
In order to translate WebSiteSniffer to other language, follow the instructions below:- Run WebSiteSniffer with /savelangfile parameter:
WebSiteSniffer.exe /savelangfile
A file named WebSiteSniffer_lng.ini will be created in the folder of WebSiteSniffer utility. - Open the created language file in Notepad or in any other text editor.
- Translate all string entries to the desired language. Optionally, you can also add your name and/or a link to your Web site. (TranslatorName and TranslatorURL values) If you add this information, it'll be used in the 'About' window.
- After you finish the translation, Run WebSiteSniffer, and all translated
strings will be loaded from the language file.
If you want to run WebSiteSniffer without the translation, simply rename the language file, or move it to another folder.


Post a Comment